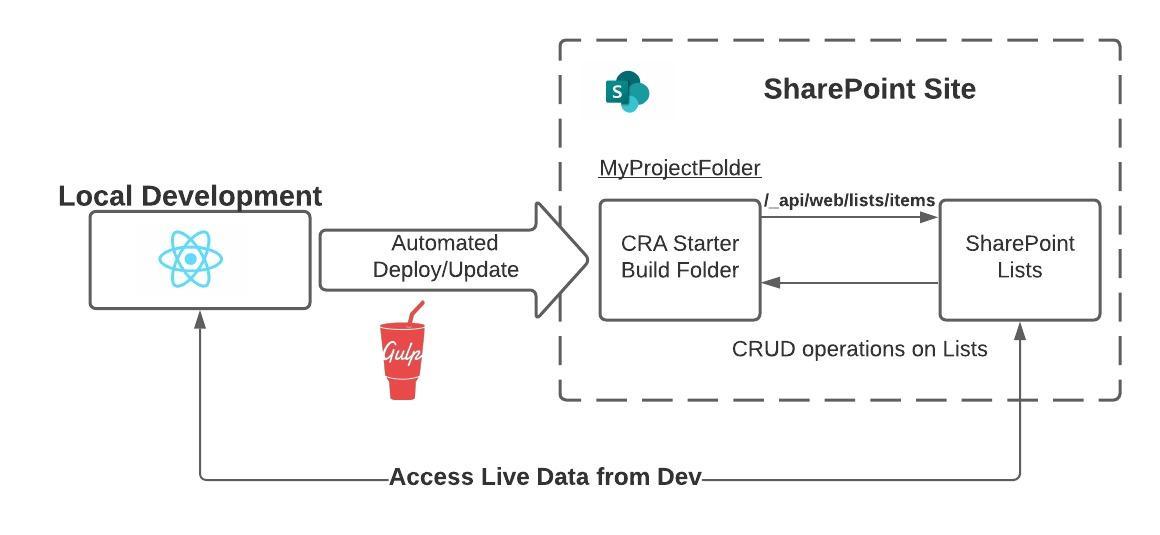
SharePoint, Microsoft's enterprise content management platform, enables teams to collaborate on files, workflows, and resources. Its extensibility varies based on the SharePoint version and site type—ranging from simple in-page web parts to the React-based SPFx development model.
Oftentimes, we would allow users to manage their own data in one or more SharePoint Lists that would serve as the backend for a React UI frontend. When deploying these types of apps, we would often run into a couple of situations where:
- Defining the look and feel without editing the Master Page/Page Layout.
- Rapidly iterating on a React single-page app if SPFx wasn't available.
- Deploying a CRA build folder to SharePoint automatically via CLI.
This led to creating a starter kit based on Create React App (CRA) to iterate and deploy quickly to SharePoint. Starting from the basic CRA template, I will walk through some of the key configuration steps to achieve a more seamless SharePoint development workflow that is able to pull in data.

Setting up the Proxy Server
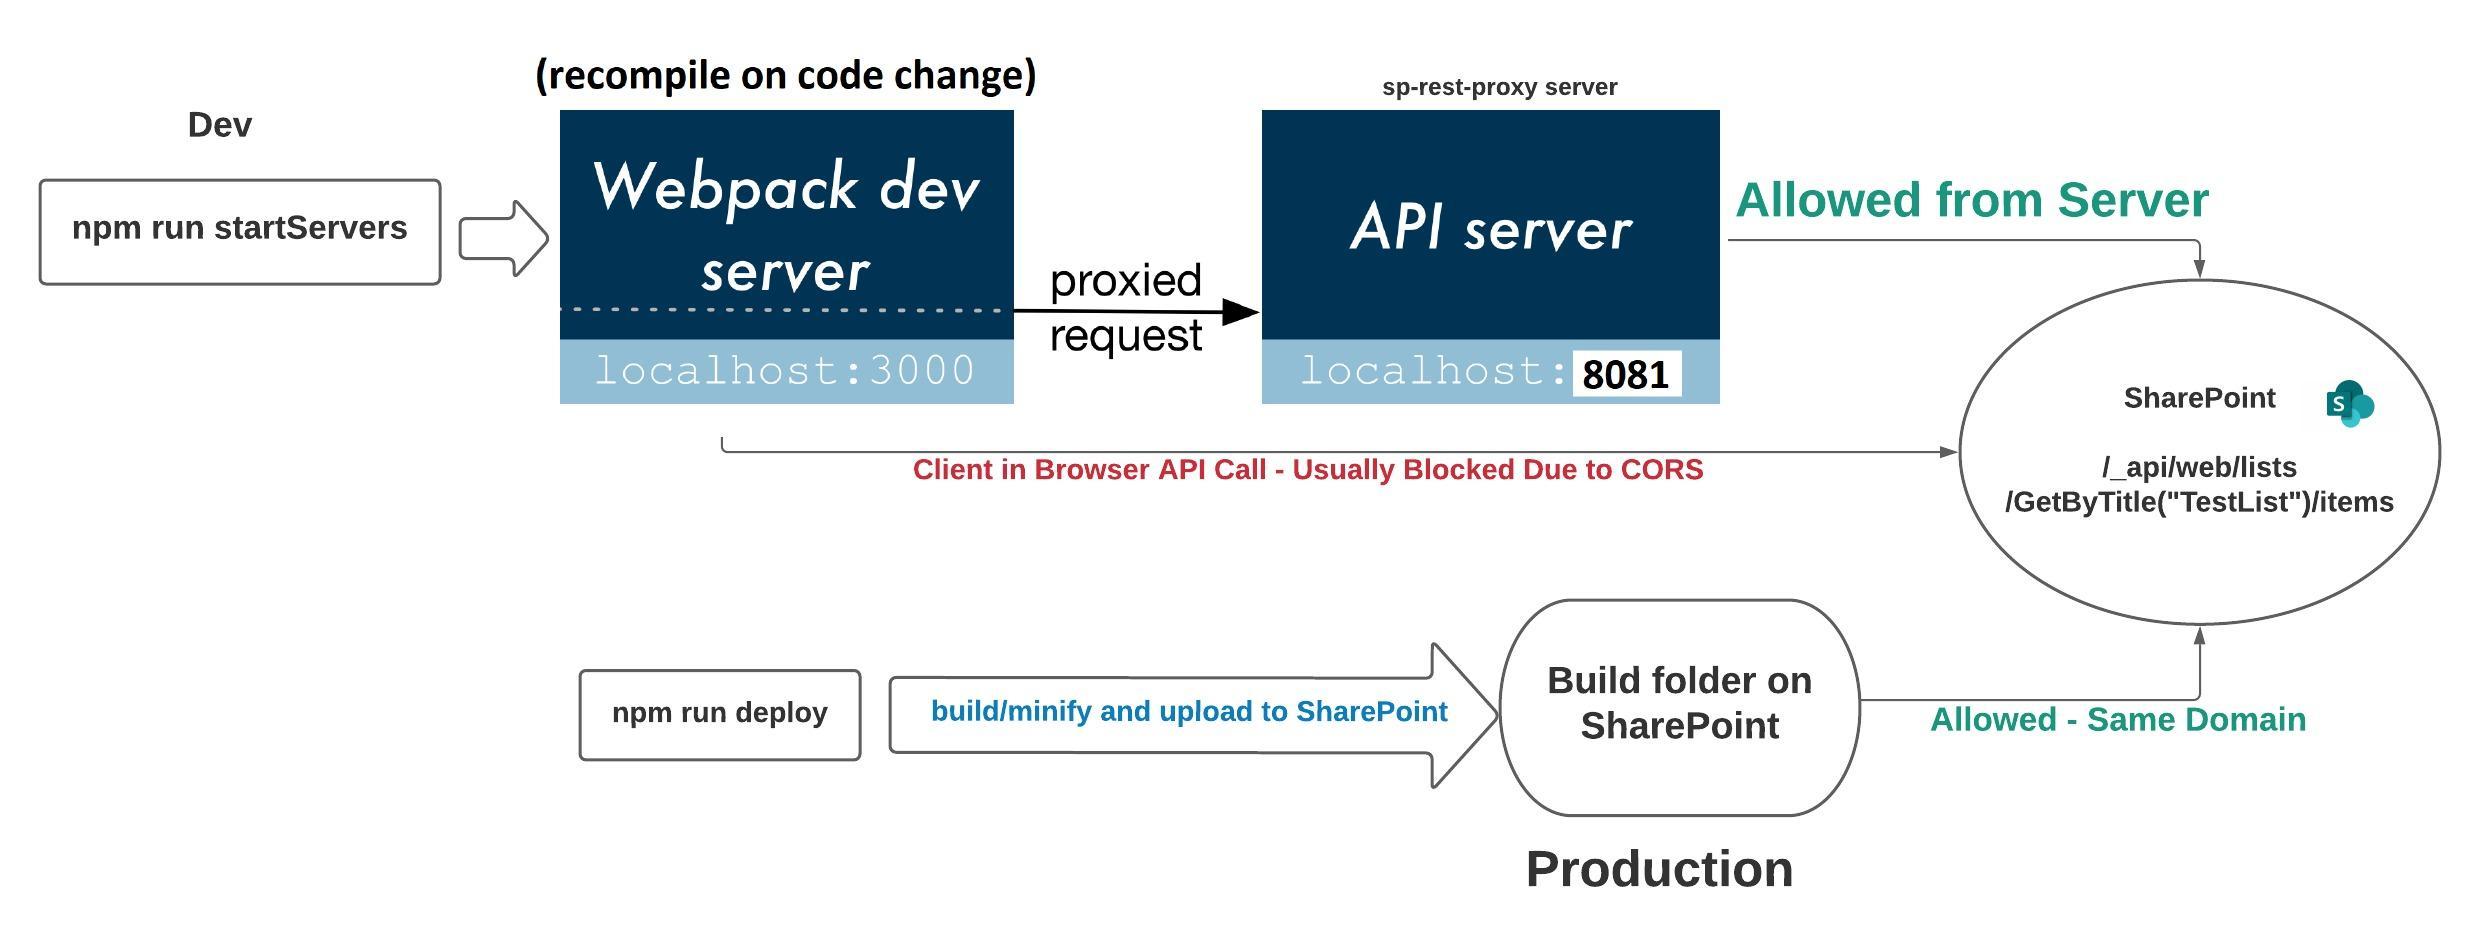
To make localhost requests to SharePoint Lists (avoiding CORS issues), proxy API calls using sp-rest-proxy by @koltyakov.
The configuration here was largely based on the great work shown here—setting up a SharePoint API proxy server using his sp-rest-proxy package. This allows a webpack dev server and a proxy API server to run concurrently. I recommend completing that simple walkthrough first—once you have that set up, you should have the following file:
Example api-server.js:
// filepath: ./proxyserver/api-server.js
const RestProxy = require('sp-rest-proxy');
const settings = { port: 8081 };
const restProxy = new RestProxy(settings);
restProxy.serve();
Add a proxy script in package.json:
// filepath: ./package.json
"proxy": "node ./proxyserver/api-server.js",
Tip: Add
./config/private.jsonto.gitignore.
With concurrently and a startServers script added to package.json, run both servers together with npm run startServers.

Test it by visiting localhost:8081.
Making API Calls
To make an API call, we're simply using the @pnp/sp package (the documentation for PnPJS accessing lists is pretty good).
There are a couple of ways to approach the initial setup of the PnPJS package—but here I'm using the sp.setup() one-time call in my App componentDidMount; it could similarly be done in a Nav component.
// filepath: ./src/App.js
let hostStr = '';
if (process.env.NODE_ENV === 'development') {
  // for local dev
  hostStr = process.env.REACT_APP_RELATIVE_URL;
} else if (process.env.NODE_ENV === 'production') {
  // for production build
  hostStr = process.env.REACT_APP_PROD;
}
sp.setup({
  ie11: true, // required for legacy IE11 API calls
  sp: {
    headers: {
      Accept: 'application/json;odata=verbose',
    },
    baseUrl: hostStr,
  },
});
We can also set environment variables in our project in a .env file:
// filepath: ./.env
REACT_APP_UAT=http://my-sharepoint-uat.com/sites/mysite
REACT_APP_PROD=http://my-sharepoint-prod.com/sites/mysite
REACT_APP_PROJECT_TITLE=sharepoint-cra-starter
REACT_APP_RELATIVE_URL=/sites/mysite
After the sp.setup call, we should be able to make List API calls anywhere in our app:
// filepath: ./src/App.js
let spList = 'MyTestList'; // rename to your own list
let items = await sp.web.lists
  .getByTitle(spList)
  .items.select('Id', 'Title', 'Description')
  .orderBy('Id')
  .get();
console.log(items || 'none');
Automate Deployment
Instead of manually uploading the build folder, I wrote upload.js, which:
- Deletes
/static/jsif it exists (usessppurge). - Uploads & overwrites the build folder (
spsave).
To run this upload script, we would need to add gulp, spsave, and sppurge to the devDependencies. Once those packages are in place, you should be able to at least attempt the upload to SharePoint with the following added to package.json scripts:
// filepath: ./package.json
"upload": "node ./deploytools/upload.js",
"uploadUAT": "node ./deploytools/uploadUAT.js",
You can optionally define a second upload script to point to your UAT site.
Fixing Tilde in Build Folder Files for SP2013
One of the catches here when working specifically with SP 2013 is that it does not allow filenames with tilde ~ characters to be uploaded to the site. To address this, we could eject CRA and configure it manually, but using the rescripts package was a simpler alternative. The more popular react-app-rewired or craco packages might have done the job here; however, I ended up using rescripts.
When trying to upload the project, you might run into an issue like this:
The file or folder name \"MyProject/static/js/runtime~main.d653cc00.js\" contains invalid characters. Please use a different name. Common invalid characters include the following # % & * : < > ? / { | }
You therefore need to add the rescripts package to devDependencies and create a ./rescriptsrc.json file:
// filepath: ./package.json
"@rescripts/cli": "0.0.14",
// filepath: ./rescriptsrc.json
module.exports = (config) => {
  config.optimization.splitChunks.automaticNameDelimiter = '_';
  if (config.optimization.runtimeChunk) {
    config.optimization.runtimeChunk = {
      name: (entrypoint) => `runtime_${entrypoint.name}`,
    };
  }
  return config;
};
At this point, when we run npm run upload, we should be able to successfully save/upload all files to our SharePoint specified folder. You won't be able to view this uploaded folder through the traditional site contents—you'll need to view it using SharePoint Designer. It should be sitting as a folder at the root of the site.
Routing with the HashRouter
When we upload to SharePoint, the app needs to simply run for users from ./index.html without a server. Routing simply does not work like this from the build folder out of the box. Therefore, we need to use HashRouter. This will add a # character to all of our routes. The more traditional BrowserRouter uses the HTML5 History API and is the preferred route when using a server or server-side rendering.
Assuming you have react-router-dom installed, the simple routing setup (which I've included in my repo) looks like the following:
// filepath: ./src/index.js
import { HashRouter } from 'react-router-dom';
ReactDOM.render(
  <React.StrictMode>
    <HashRouter>
      <App />
    </HashRouter>
  </React.StrictMode>,
  document.getElementById('root')
);
// filepath: ./src/App.js
<Switch>
  <Route exact path="/" component={Home} />
  <Route path="/sampleroute1" component={SampleRoute1} />
  <Route path="/sampleroute2" component={SampleRoute2} />
</Switch>
The final configuration step for HashRouter is to specify the homepage in package.json:
// filepath: ./package.json
"homepage": "./",
IE11 Legacy Support
To support the older IE11 browser, simply install the react-app-polyfill package and include it in index.js:
// filepath: ./src/index.js
import 'react-app-polyfill/ie9';
import 'react-app-polyfill/stable';
Deploying
With all the primary configuration done, we can define our deploy scripts (UAT again is optional) in package.json:
// filepath: ./package.json
"deploy": "npm run build-re && node ./deploytools/upload.js",
"deployUAT": "npm run build-re && node ./deploytools/uploadUAT.js",
Then running npm run deploy will regenerate our ./build folder, delete the old build folder on the SharePoint folder, and upload the new build folder files.
Users can then simply be given the URL to the index.html file, i.e.:
http://my-sharepoint-prod.com/sites/mysite/MyProjectFolder/index.html
Their permissions to the site will simply be set at the site level.
Summary
Check the full package.json. With this starter kit, you can:
- Build & upload a React app to SharePoint.
- Make API calls from localhost and deployed environments.
- Use routing without an HTTP server.
The project's aim was to focus on building a React app that leveraged SharePoint List data, avoiding traditional SharePoint development complexities. The end result for our team was being able to more rapidly iterate and deploy solutions—and ultimately being able to focus more on our clients' needs.
There is probably additional work or possible improvements that could be made—such as converting to TypeScript, Dockerizing, or integrating with other automations on a CI/CD tool. You might even include a suite of domain-specific tests against SharePoint List data. Feel free to make pull requests or raise issues on the repo. I hope this guide has helped—it turned out to be quite useful for some of my work projects.